About Me

My photo
Cambridge, MA, United States

Sunday, March 31, 2013

Lens Bokeh Analysis


<<This topic is under development>> << Online version is only a draft >>

What characterizes the bokeh in a photograph? I mean not the shape of the bokeh, but the bokehness or the bluriness. We know that bokeh mainly depends on the aperture, focal length, and the focal distance. It also depends on few other things which will see later. The relationship between the size of the bokeh (circle of confusion) and the above mentioned parameters is a well established concept.

Here, I’d like to graphically plot and show how aperture, focal-length, distance and sensor size makes an impact on the bokeh. My objective is to provide a visual or a mental tool to quickly assess the blur characteristics given a set of parameters. And, perhaps help in understanding why bokeh in large-format photography is unique and often not reproducible in 35mm (full frame) format photography. We will also see how lenses such as EF 85mm f/1.2 and EF 200 f/2 differ in bokeh. Which of these lenses gives more bokeh? if you want to know the answer, please continue to read this discussion!

The size of the bokeh, let’s designate it by it’s diameter $C$, is given by

$C = \frac{\Delta }{{{s_1} + \Delta }}\frac{f}{N}m$

where, $f$ is the focal length, $N$ is the aperture, for instance $N=1.4, 2.8$ so on. $s_1$ is the distance to the subject, meaning, the camera is focused to the subject which is at a distance $s_1$. These parameters should be familiar if you are doing semi-serious photography. Now let’s look at less common terms: $m$ is the magnification and $\Delta$ is the relative distance. I will explain these two terms now.

Tuesday, March 19, 2013

Aperture Play – a customized EF 50mm f/1.4 Lens.


I wanted to play with the aperture of a lens, for instance to simulate anamorphic bokeh, gaussian aperture (apodization), and other aperture masks. By introducing aperture masks, we can control the blurring (bokeh) and hence control the appearance of the photograph. Carefully designed aperture masks can be used to perform computation on photograph that can reveal depth, for example using coded aperture: http://groups.csail.mit.edu/graphics/CodedAperture/.

I was inspired by the work of Markus Keinath here: http://www.4photos.de/camera-diy/Apodization-Filter.html. In order to access the aperture, the lens needs to be opened, which can be a pain. This especially hinders experimentation. I wanted a lens system where I can have constant access to the aperture. This way, I can see the live video from the DSLR while the aperture masks are being modified.

My Lens Modification

I modified a Canon EF 50mm f/1.4 lens by creating my own lens assembly. f/1.4 is quite large enough for the purposes. However, EF 50 1.4 costs about \$300, which is one downside of this choice. A cheap (\$75) FD 50mm f/1.4 would have also served the purpose, but this lens has mechanical compatibility issue with modern dslrs. The back element projects into the mirror assembly of the dslr when lens it focused a infinity.

Here is the regular lens and the modified lens:

image 

The focusing is achieved using a small slider mechanism (with the knob as shown). The acrylic pieces were cut using a laser cutter. The metallic mount came from the original lens itself.

imageThe aperture can be introduced into the slot shown in the above picture. One issue with the mechanism is the light leak. The aperture region and other lens regions have to be covered with a black enclosure to avoid light leaking into the lens.

Aperture Masks

image

Using microsoft power point, I drew a bunch of aperture masks as shown above and printed them using a laser printer on transparencies. I then cut them into ‘inserts’ so that it fits into the aperture slot. Here is a printed ‘gaussian’ aperture mask:

image

Some Results

Image screen captured using EOS Record Utility. I know I could have taken a photograph, but this was more convenient in my setup (didn’t want to download images, edit etc). All images are straight from Live View video.

image


Video


Issues

Issue – 1: Quality of Aperture Insert

<<Discussion>>

Issue – 2: Cat Eyes

<<Discussion>>

Issue – 3: Light Loss

Issue – 4:

Future Work

  • Analog film printing of aperture masks.
  • Colors in Aperture mask

Saturday, August 4, 2012

Shooting Ciprian Costin and Tina Guo

I was hired to do a short video on the musical piece composed by Ciprian Costin, and performed by Ciprian Costin (on piano) and Tina Guo (on cello). The happy surprise was that the recording was in WGBH recording studio, which was just amazing (always wanted to sneak into wgbh). The tricky surprise was that I had to record during live performance! .. it was tricky because any tiny noise I make gets a frown and will stop the recording.
 
Live recording means, now sounds, no moving around and no stressing the hard-wood floor, no camera noise, no tripod noise, no hard breathing.. no nothing. Two times-- once my knee and the other time my ankle made a cracking sound while I waked. Never thought I produced so much sound.
 
With that constraint, I set up two cameras -- one static, looking at one of the artists and the other with planning/sliding control. The other main issue was the lighting. The scene had lots of hot spots, even though it looked great to the naked eye, it just is hard ball for the low-latitude dslrs. Although the studio operator offered to dim the lights, it still wouldn't eliminate the hot spots. Anyhow, that is what it is.. and I had to with it.
 
Another issue, perhaps the aesthetics, is all the mics and wires running around. Here we have a gorgeous studio, and great artists, well dressed.. and we have red, yellow, green cables snaking around.. oh, they may also trip you if you are not paying attention.
 
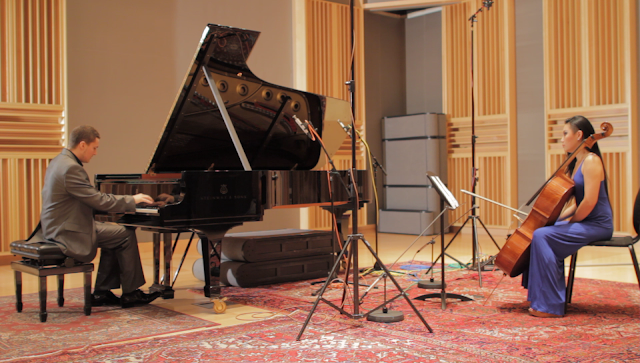
Ciprian Costin on left and Tina Guo on right.
 
The angle-- because we cannot easily move the musical equipment like the giant piano, and that artists want to sit and orient in certain way, videography becomes even more challenging. I had to squeeze in corner to get certain shots.. and because of the short distance had to pick wide angle lenses.. good to have 24 f/1.4 and ze 21 f/2.8 handy there.
 
The bokah-- I wanted to create really blurred background, just to make the video look really cool. But, it's hard to accommodate large lenses within the short distances. I wish I had taken the 85 f/1.2, that lens would have been perfect for the purpose. Instead I had to run really far with the 200 f/2. In my opinion the best companion lenses are 24 1.4, 35 1.4, 50 1.4 and 85 1.2. Other lenses are useful, like I shot really up close of piano, the cello, and faces with the ze 100 f/2 makro planar.
 
Motion Control -- I wish I had. In case if I run into getting a motion-controller slider or panning/tilting systems in future, the noise performance would be one important factor. They also need to have both a position control as well as velocity control. A classical music such as the one I shot really only needs a very smooth and slow camera motions. I think faster motions would go against the theme and will influence the overall delivery.
 
Audio syncing -- The studio does the multi track recording, so I do not need to record on board. However, I still need the crude audio to aid in syncing during post production. The onboard mono mic on the dslr just served the purpose. Due to a technical issues, first 20% of my videos missed audio.. I think that bit is going to grind me.. basically I need to figure out what they are performing just by looking at the piano key strokes -- or I just have to chuck those video segments.
 
The Video rate -- I choose to shoot at 1080p 30fps, with 1/30th shutter speed, at max aperture (either f/1.4 or f/2). This landed me ISO100 to ISO400, and rarely sometimes ISO1000. Damn I forgot to whiteblance and I just left it at Auto-White-Balance. I do like the warmness of the tungsten and I want to retain that in the post.

The Choice of Perspective -- One thing I realized much later, is that I should have thought about View volumes or view regions right in the beginning . Since I had two cameras, I decided to keep one stationary/ unmanned and the other one to manned to take panning/sliding shots. The idea is that I can then switch between views in the editing. Stupidly, I was entering the view of static of cameras while I handled the other camera. This is not too much of an issue as I can replace those "intruded" scenes with in-hand camera views, but, nevertheless, something to keep in mind.
It might be good to understand the geometry of the whole scene, to figure out interesting view points and place the camera there.. and also to keep in mind to avoid stepping into the view frustum of the camera unintentionally.
In a musical, the expressions of the artist, the hand movements on the instrument, and the instrument itself-- all are part of the action. Some times, the artists look at each other to communicate (as I understood) certain cues that help them to pace and do better. It might be important to capture this and hence may need certain perspective to see both the artists' faces in the same shot.


I will update this blog after I've gone through some steps in post processing. I am writing this blog only as a reference to myself to help in future production. No harm in making it public as anyone could benefit.
 
Cheers!
Manohar


Wednesday, August 1, 2012

Bokeh-ness, which lens to use?

 
If all you care is bokeh, how to decide which lens to use?
 
I've come across a number of articles and videos that talk about bokeh and depth of field in photography. But, I could never find a easy-to-access simple rule-of-thumb answer to a key question that I think one should ask and know the answer.

I assume the reader already knows what Bokeh in photography means, if not see here. A related, and more scientific terminology is Depth of Field. I am using the term Bokeh here in the usual sense, meaning “blurr”. Photographers love to have nice good bokeh in their photograph, and they seek out for expensive lenses, perhaps something line 85mm f/1.2 or 50mm f/0.95, and so on. It is somewhat well known in the community that bokeh-ness depends on the subject distance, the focal length, and of course the f-number or the aperture number. So, for a particular shoot, if all I care about is bokeh, and I have a number of lenses to choose from, how do I decide which lens to use? I answer this here:
 
Question:
How does various lens compare in terms of bokeh-ness?

For example, will a 50mm f/1.4 lens produce more (or less) bokeh than a 200mm f/2.8 lens?
 
The short answer is: yes and no!

The long answer is: A 50mm f/1.4 lens will produce more blur or bokeh of objects that are in immediate vicinity of the focus plane than a 200mm f/2.8 lens. However, a 200mm f/2.8 lens will produce more blur/bokeh of objects that are infinitely farther away from the subject. Note, I am assuming both the lens are operated at their maximum aperture opening (f/1.4 for 50mm lens, and f/2.8 for 200mm lens), and that we are shooting at the same magnification – meaning, the subject size remains the same.

Consider this example. You are shooting a portrait or a head shot with some distant background, perhaps a tree which is 100s of feet away. With a 50mm lens at f/1.4, you'd probably be about 3-5 feet from the subject, while with a 200mm lens, you should be about 12-20 feet away so that you have the same magnification, and hence the same subject size in the photographs in both cases.
<< EXAMPLE IMAGES -- AT SOME POINT>>

50mm f/1.4 Lens – Focus set on the eyes, one can see the ears and nose starts to blur off gradually. The background is even more blurred.

200mm f/2.8 Lens – Focus set on the eyes, the the nose and ears start to blur, however, not as much as in the 50mm lens case. But, the distant background is far more blurred than the 50mm lens case.

Takeaway message: 50mm f/1.4 lens produces more blurr immediately around the subject, however not as much to the distant background. However, the 200mm f/2.8 lens produces less blurr around the subject, but produces more blurry background.
******
The Rule of Thumb

The amount of blur in the immediate vicinity of the focus plane depends purely on the aperture number or the f-number. So,  f/1.4 will produce more blur than  f/2.8

The amount of blur of the distant background depends on the ratio: (focal-length-of-lens) / (f-number). So, (50/1.4) produces less blurry background than a (200/2.8).
Because 50/1.4 < 200/2.8
 
Assuming same magnification (subject size remains the same in the photograph).
 
******
 
 
The Right Choice
 
One of the main benefits of having a large aperture lens like f/1.4 or f/2.8 lens is that the background can be made blurry so that the subject stands out. So, what lens to use in a given situation: it depends, of course!
 
If you are interested in a very dreamy portraiture, where the eyes are in focus, and rest is blurred out shoot with a small f-number lens, like f/1.4 or f/1.2.
 
If you want the portrait of the subject to be more sharp overall but want the distant backgrounds to be dramatically blurry, shoot with a 200mm f/2 lens or a 400mm f/2.8 lens or any bigger white lenses.

A side note: If you have a 2X extender, this would make, for example, a 200mm f/2 lens into 400mm f/4 lens. With this modification, the background bokeh-ness will not change because the ratio is still the same. However, the subject will be more sharper because of f/4 aperture.
 
*************
 
Mathematical Derivations


Plot shows the bokehness on the y-axis, and distance _from_ the focus plane or the subject plane on the x-axis.

Plot of Bokeh-ness


***

Some Useful References


[2] Bokeh from Wikipedia http://en.wikipedia.org/wiki/Bokeh


[3] Circle of Confusion: http://en.wikipedia.org/wiki/Circle_of_confusion -- this is the place I referred to the equations for my derivation and plots.


Friday, July 13, 2012

IISc Digital Logo After Seven Years

It's been seven years since the first release of digital/vector logo of Indian Institute of Science. It now appears on the main site and hundreds of other places, both online and in print. Making this 3D (and 2D vector) model of the logo was a personal project and it is more than pleasing to see how it gradually entered the main stream, replacing the antique version of the logo.

In 2005, I took a series of photographs of the cast iron emblem of the logo in front of the main building. Using these photographs as a reference, I created the 3D model in 3DS Max over a period of two and a half months.

Disclaimer: Modeling the logo was my personal project and no organization or institution paid or asked for my services. I own the copyright for this version of the 3D model and the 2D vector graphic. I expect credits when used.

This 3D logo is similar to the original antique logo and also to the physical emblem found at several places on campus, BUT it is not the same. In order for it to be in the 3D form, the logo had to be inherently different from the prior versions. Moreover, a number of design choices had to be made during the development, for example: symmetry, proportion, size of the individual elements like the leaf, garland, lamp post, curvatures, the cloth ties, and title ribbon, the size of the font.. etc etc. Because of these design choices, the final result is what it is.


July 13, 2012. Logo is used on the main site: www.iisc.ernet.in


-------------------------------------------------------------------------------------------------------------------------


3D Model Released to Public on Sept. 2005, on TurboSquid.com:
http://www.turbosquid.com/FullPreview/Index.cfm/ID/275673

IISc_logon13.maxIISc_logon13.max

Vector Version (PDF, AI)
http://www.turbosquid.com/FullPreview/Index.cfm/ID/335189


-------------------------------------------------------------------------------------------------------------------------

Usage as of July 2010.


-------------------------------------------------------------------------------------------------------------------------
Manohar Srikanth